Pages

Friday 15 February 2013

1914 Sunbeam 12/16

1914 Sunbeam 12/16

1914 sunbeam 12/16 sporting model

Cars, cars, cars. Love them, but some are more special than others.....and here's one

Background

Now a 12/16 Sunbeam isn't all that rare, but they are greatly respected. However this one is really something special.
Sunbeam, under the leadership of Louis Coatalen had a good idea, and one that's been copied many times since. That was, why don't we build a racing car, have it win some big prestigious event, and reap the reward of all the publicity and kudos that it will bring us?
In 1912 they entered three identical cars in the Coupe de L'Auto event held in Dieppe, run in conjunction with the Grand Prix at that time, and they came in first, second and third!
Not a bad result at all! Already a successful company, this cemented their name in history and made them one of the highest profile car makers on the planet.
So what has that to do with the little car in the picture?  Well it differs from other 12/16's in several ways, and has a little mystique about it. Mainly its about the engine. It appears to be fitted with a factory made but uprated engine. It's thought in some cases that this is in fact a Coupe De L'auto spare or development engine fitted in a standard car.
Whether it is or isn't doesn't really matter, but we know it has bigger valves, bigger inlet manifold and carb, and bigger exhaust manifold. The webs are cut out at the bottom of the block casting between the cylinders, and there is no provision for a cover over the valve springs. It also has extra cooling to the head, not seen on any other, and it goes like a bomb! All of these bits are featured on the racing engines.
That's all well and good, but it only has brakes on the rear wheels, and they are operated from the hand brake, so it can be a handful at times.
Its a sporting model two seater, and that makes it rare as well, but it also features what looks to be a factory copy of the radiator fitted to the Coupe De L'Auto racers. Its distinctive, as its tall and narrow, and has an obvious peak at the top. This affects the whole look and stance of the car.
It sits nicely on the road and the lines are somewhat more purposful than other 12/16's of the era.
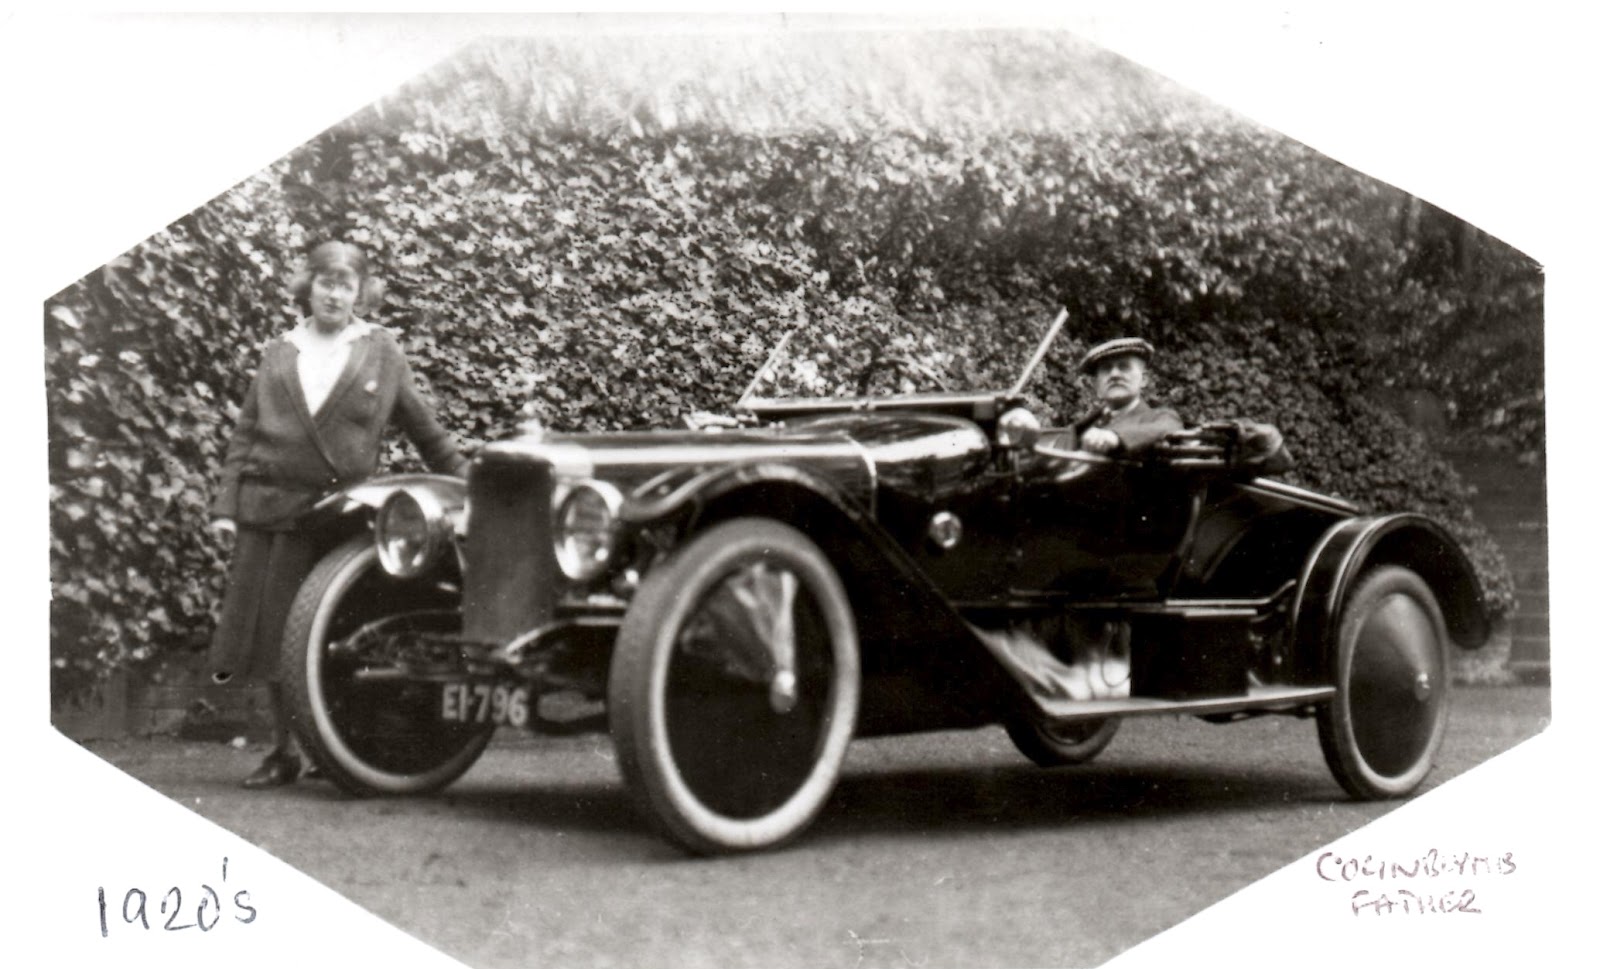
Photo from around 1920 of the same car

History


The photo above was taken around 1922 and features the then owner Mr Byrne. It looks great in the darker colour, so that may be something to think about in the future.
As far as we can find out, the first registration was in 1919 and the car was sold by Paddon Brothers in London, to a Mr. Gordon Lang. The registration was in County Sligo in Ireland. This is all a bit odd. The car is clearly older, and by 1919 Sunbeam had stopped making this model, so what was it doing before?
The Sligo registration was apparently not uncommon. Gentlemen who owned sporty cars often registered them at 'sympathetic' locations to delay possible contact from the constabulary, if they were spotted driving 'erratically', in the days when all communication was by post!

1912 Coupe De L'Auto Sunbeam at Dieppe

It could have been that the first world war delayed the registration, or that the car was put together closer to that date, but at the moment its all supposition.
It was then sold to Mr Byrne who owned it for a few years and is pictured above in the car.
After that it was owned by  another gentleman and then left in a barn for 30 odd years before being discovered by John Olleronshaw from Norwich. He acquired the car and rebuilt it and then used it at many events for over thirty years. He had a lot of affection for the car and called it Miranda, and I have been lucky enough to speak to him personally about it. He was fascinated by the history and had first hand correspondence with Gordon Lang, who was the first owner as far as we can tell.
After that it briefly belonged to Mr. Pritchard who sadly died, and it was then acquired by my father in 2003.

Engine

The engine is 4 cylinder and 3016 cc, it has a four speed gearbox, plus reverse, with a cone clutch. At some point the fan has been modified to put it closer to the radiator. We think that back in the day, these were susceptible to overheating which is why this may be the only engine left that's working, and this was done to improve things. The racing cars had no fans fitted at all. I now run it with Evans waterless coolant, which helps even more to prevent boiling, and 'after boil', a phenomenon which occurs when a hot engine stops and the residual heat boils the water in the block, and without the pump turning etc the effect produces steam which conducts the heat away less efficiently, and compounds the problem. This can cause fatigue in the castings and eventually a failure.


Its a beautiful little car, with two seats and a 'boot' which looks like it may have been an occasional dickie seat, however it folds up towards the front, so anyone sitting in there is in danger of being sliced in half!
The condition is quite original, although it was refinished (rebuilt in fact) in the early '60's, but it has developed a lovely patina now, and is a long way from being immaculate, but perhaps all the better for it

On the road

Well currently I have broken the starter motor so we are back to swinging it. The car starts fairly easily but with the big manifold it takes a couple of goes to get the fuel up! Once started she will tick over at around 280 rpm. The advance and retard lever for the ignition has to be set carefully retarded for starting and then advanced when on the road.
As with a lot of cars of this era, first gear is very short, so its only good for a few mph before second is needed. Third gear is good for about 35, and then there is quite a gap up to fourth. If you are going uphill on this change, it can make quite a difference.
The car tops out just over 50 mph, and cruises at around 45, that equates to about 1750 rpm.
The steering and handling are superb! When you consider the car is a hundred years old, motoring through the country side (with good forward vision) is a joy. The car turns well and produces very little body roll, something I haven't been used to on other cars I've driven from this era.
However if you are going for it and the road gets bumpy, then you do get buffeted about. Once again the brakes really are the limiting factor and cause you to be looking further up the road for obstacles than you might expect
Anyway, for now, I am looking after it, and enjoying it immensely. Its is beautiful, usable, fun, and till now unique!

Tuesday 29 January 2013

How to cure and cook Ham at home, recipe

Home Cured, home cooked ham


Home made ham

Home cured, home cooked ham can be one of the nicest things to eat, plus if done well, will always look impressive. You can amaze your friends by curing a whole leg of pork and cooking it for the sum total of about one man hour of effort (or woman hour, its christmas after all). Not a bad return when you also consider the cost of buying one that is ready done.

Requirements

  • a plastic bin big enough for the pork. I literally bought a swing top bin.
  • some curing salt
  • a cool place
  • leg of pork
  • brown sugar and mustard for the glaze
  • a big pot to cook it in

Ok, a simple and short list, but here are the details. The 'bin' needs to be an appropriate size and shape for both what you are going to cure and where you are going to do it. I bought a fairly narrow bottomed swing top bin, as I cure mine in the bottom of an old fridge and it fitted the space. Also it means that when the pork is in, its easy to trap it against the side and weigh it down (with an old, plastic, 4 pint milk container full of water). If you've got a swimming pool, imagine keeping a leg of pork under water. So its fairly snug with a whole leg, but also fine if you want to do a piece of belly or loin for bacon, or a bit of salt / corned beef, or brine your Christmas turkey (oh 'ello, we can do all that? Same bin, same brine)

Some curing salt, I got mine from www.weschenfelder.co.uk, and used the butchers quick cure. If its your first time, don't muck about and be clever, I've done that! Buy this proper cure make it up to the instructions, add more sugar than it says (about double) and sling your pork in it. I've tried doing ham using cider, apple juice, juniper, bay, treacle, molasses, etc etc etc, a very long list! I cant taste the difference! Gosh what an admittance! All these posh chefs go on about adding a bit of this or a bit of that......Dont't gild the lily, perfectly cured, cooked, glazed and baked ham is wonderful, and it doesn't need anything else.
I will admit that if you add treacle, the ham goes an attractive dark colour, which I like, but that is it. Trust me this will be impressive enough, it doesn't need and extra anything.

A cool place, this is going to be in for a while and it needs to be kept cool. Second hand fridge on ebay is around £40, shop bought whole leg of ham £60-£90. After its cured it will need to hang a while to mature and so that the cure etc can equalise, so a fridge big enough for that as well would be a good idea.

Leg of pork! Well alright! Get the best one you can....common sense! Outdoor reared, free range slow grown, it all adds a bit, and this is a fairly simple product so it stands or falls on the quality of the pork. However, if I'm honest, hamming improves pork, so even a cheap leg will come out fine. For this recipe we had a 6.5 kg leg of pork bone in. Thats not huge but its plenty to go at and much easier than a really big one for all sorts of reasons. The biggest one I did was 11 kgs! The cooking time alone meant i had to have a day off work!

A big pot to cook it in...seriously...think about this before you buy the pork! You need a BIG pot, see if you can borrow one. Ask anywhere they do catering (but maybe not commercially) so the local school/nursery, the local village hall kitchen etc in case they have a spare. You are not getting this in a saucepan! Also think of the weight....6.5kg of pork, in a pot topped up with 15 kgs of water...and its going to be hot when its done, and stay hot for hours.....So two sturdy handles, big enough hob, and a helper!

Curing Stage

Ready? Excited? shall we begin? Right, get yer bin, put some water in it ( you can put it on bathroom scales, or just count in the measuring jug fulls to get the volume) I used about 13 litres of water, half the pack of curing salt and a pound of caster sugar. Now the first trick, have some ice cubes ready, and add them, using them to make up your total water requirement. This cools the brine down so you can use it immediately, as it will take 24 hours to bring the water down to fridge temperature (unless your water is really cold, for some reason ours isn't). Stick your bin in the fridge, put your leg of pork in, weigh it down with your milk bottle, go and have a cup of tea....I reckon thats 12 - 15 mins work, and you are nearly done!
Trick number two....to be completely honest, I also injected mine a few times with the brine, down the edge of the bone. Now its not strictly necessary, but if its going to taint, its going to do it around the bone, and thats the bit that is furthest from the cure, and so is the last bit to get done. Hence big marianade syringe, stab it through at right angles to the bone and give it a squirt....Now the purists are rolling their eyes, not only haven't I dry cured, but now I'm injecting....tut tut. Well I'll tell you the truth, brining makes better ham! Its moister, its reliable, its safe and it works. I do a lot of dry curing, salami, bacon, breasola etc, trust me, brine your ham.
Ok its plopped in, leave it for ten days (6.5 kg ham), thats it! Remember the brine only really penetrates through the cut side, not the skin so as long as you've placed it so thats accessible, you're all done.

Maturing/equalisation

Sounds an odd heading, but the reasons are this: The ham nearest the brine is the saltiest, the ham furthest away the least salty (kind of..trust me!) so in hanging it up now, you give the cure/salt time to spread (if it needs to) and generally equalise throughout the meat to make it uniform. Remember once its out, no more salt is being added, its just redistributing. So for the very ham in the picture above it had 13 days. It dries a little in this time but not much. ( I have check weighed meat hanging in the fridge and while equipment can vary, I see very little weight loss at fridge temperatures with the humidity above 75%) Thats it, about another two minutes, I guess.

Cooking

Now before cooking I pre soaked the ham for exactly 12 hours. The end result was less salty than it could have been, so slightly less soaking would have been ok...In other words you do have some margin for error.
Fill your big pot with water enough to cover the beast...carry it to the cooker without giving yourself a hernia, and get it on the heat, it'll take a while. Fetch your leg of pork and put it straight in and wait for it to warm up......
Super important, ultimate trick to making perfect ham.....temperature is vital!! Vital, I say....You will need two thermometers, one for the water, and one to test the ham for doneness. The water needs never to boil, any recipe that says boil your ham for blah, blah, blah....is rubbish and should be put in the recycling. They have obviously never made ham before. The water needs to be 80 degrees centigrade, thats barely a simmer. Timing...once again any recipe that says boil for 20, 30,40 minutes a pound is pants unless they specify the temperature, its not going to be precise enough. If you must know a timing, cos you dont want it to bugger up pub time, then I would have to say 17 minutes and 14 seconds a pound at 80C, approximately! But the real test of when its done, is when a probe thermometer says 67C. 
If you cook it too hot or too long, you will know because it will be dry and 'stringy' to look at. When its right the cut side will be smooth and slightly soft, and it will carve excellent slices. If you cant get good slices and your knife is sharp, then you cooked it to long or too hot.
I cant believe some of the instructions in recipe books, talk about vague, and if you knacker a whole leg of pork, it makes you want to cry. Its not the money, its just such a shame, such a waste, when the instructions are so simple.

Glazing and baking

Ok so the ham is out, you need to carefully skin it leaving as much fat on the ham as you can. The skin normally comes off easy so its a bit slippery but not hard.
Then you need to score the fat in a diamond pattern. Try to do it as deep as possible without breaking through to the meat. Then stick it with cloves in the diamond shapes in the fat, and apply your glaze.
Tip...do this when that ham is still warm from the cooking, but not so warm that you burn yourself. Dont let it get cold and do it the next day, because the glaze wont spread nicely and the ham sucks all the heat out of the oven so that it takes ages for the glaze to caramalise, which means it gets overcooked etc. Put the ham on a big baking tray which has been lined with tinfoil (cos once the glaze is baked onto your tin, you'll never get it off) The glaze is brown sugar and mustard, mix it up to taste, but as you work it the suger dissolves into a gooey paste. Spread it on top..Put is in a hot oven 200 - 220 and check it after 10 minutes (one recipe I read said an hour!!) its done when it looks done. When you pull it out and gasp, thats enough time!

The Eating

Once you've let it cool, it needs to be refrigerated, it will then keep for around a week. When you slice it you should get pink 'soft' meat and a smooth cut surface. It will be devine on its own, with pickles, in a sandwich, with your fingers, even with a knife and fork. I've made a few now, and this is the recipe and method I'm happiest with.

The Final Secret

I was recently 'persuading' a chum of mine to try oysters with me, the comment came back that he had had them before and wasn't very keen. I told him the difference now was the company he was in (conceited? moi!) he tried them...he liked (tolerated) them. Both of us then tried the same ruse on someone else, and again it (sort of) worked.
The ham in the photo I cured and mostly cooked on my own, but by some strange coincidence about half an hour before the end of cooking the door bell kept going, and people kept arriving. It was coming up to Christmas so some had cards, or pressies for the kids (none brought drink). I then had to take the ham out of the cooking liquor, skin it and glaze it with an audience, and lots of spurious advice. 
As it was a couple of days before Christmas I offered everyone a drink. One thing lead to another and I think we consumed a quarter bottle of Gin, a half bottle of Whiskey, some red wine and a couple of beers. It was one of the most enjoyable afternoons of cooking, banter and tasting that I've had. So the final secret....its still all about the company!
With thanks to the Scouser for drinking my Gin, Cleeve for sage advice, Farmer Giles without whom I would be nothing, and Crazy Andy for everything else including the photo...oh and my mum for telling me I was doing it wrong!